Saturday, June 17, 2023

Circuitos. Amplificador con transistor bipolar

En este capítulo vamos a profundizar en uno de los clásicos de la electrónica analógica: El amplificador en emisor común con divisor de tensión.

Se trata de un uso del transistor NPN en su zona activa con el fin de amplificar una señal pequeña. Base de amplificadores diversos, como los de audio.


Análisis teórico

El divisor de tensión formado por Rb1 y Rb2 polariza la unión Base-Emisor con una tensión 

VB = VCC . Rb2 / (Rb1+Rb2) = 1.15V

Para que la base siempre esté polarizada, hay que tener en cuenta que la señal de entrada (Vin) se sumará a la componente continua (del divisor de tensión). Esta ha de superar la tensión de polarización mínima de la Base, incluso en valores pico negativos de señal de entrada. Es decir que:

VB + Vin(min) > VBE(on) + VE

Donde:

  • VBE(on) es la tensión base-emisor mínima para polarizar el transistor. Su valor está entorno a los 0.6-0.7V para transistores de silicio (los comunes)
Podemos estimar matemáticamente todos los demás valores de funcionamiento del transistor en reposo (sin señal de entrada Vin), lo que nos permitirá identificar la recta de carga y el punto quiescente:

  • VBE (tensión Base-Emisor) la podemos aproximar a 0.7v. Aunque implicará un error de precisión, en la mayoría de los casos nos permitirá obtener valores bastante aproximados. 
  • VE (tensión de Emisor respecto de masa) es igual a VB - VBE = 1.15v - 0,7v = 0.45V
  • IE (corriente de Emisor) por ley de ohm es igual a VE / Re = 0.45v / 10Ω = 45mA,
  • IC (corriente de Colector) es igual IB + IE  pero IB es muy baja (ver curva característica), por lo que se puede aproximar que IC ≈ IE = 45mA.
  • VRc (tensión en Rc, o entre fuente (VCC) y Colector) es igual a Rc . IC = 4.5V
  • VC (tensión de Colector respecto de masa) es igual a VCC - VRc = 4.5V
  • VCE (tensión Colector-Emisor) es igual a VC - VE = 4.05V

    Volviendo al circuito:

    • Rc
      permite establecer (junto con VCC) la recta de carga estática, permitiendo calcular los puntos de corte y saturación. El punto Q de trabajo será la intersección de la recta de carga con el VCE calculado.
    • Re aumenta la estabilidad del amplificador, pero ha de utilizarse en paralelo con un condensador (Ce)
    • Ce es un condensador de desacoplo para atenuar componentes alternas y mejorar la estabilidad del amplificador
    • Ci y Co son condensadores de acoplo que eliminan la componente continua. Para ello han de elegirse de manera que su reactancia sea baja para las frecuencias utilizadas en el amplificador.
      La gráfica siguiente muestra como es la respuesta frecuencial de la reactancia (XC) de Ci y Co en este amplificador de ejemplo.

    Análisis en simulación

    Para simular este amplificador, utilizaremos un circuito de pruebas para transistores BJT que he desarrollado sobre el simulador de Falstad. 


    Se puede acceder a la simulación del amplificador en este enlace: ENLACE

    Poniendo el amplificador en reposo (desactivando la fuente de señal pero dejando la fuente de tensión), obtenemos valores

    • IB=384µA, superior a los 200µA para el punto Q calculado arriba, 
    • IC=38.5mA, algo inferior a los 45mA calculados previamente
    • VCE=4.8V, algo superior a los 4.05V calculados previamente
    • VBE=690mV, similar a los 0.7V considerados previamente

    Pareciera que o bien la simulación, o bien los cálculos son incorrectos, pero debe tenerse en cuenta que el transistor elegido en la simulación es un modelo genérico que no funciona exáctamente como el BC547 utilizado, por lo que los datos obtenidos son diferentes, pero orientativos.


    Análisis empírico

    El paso siguiente es montar el circuito y medir los valores anteriores, con un BC547 real, con el fin de comprender mejor el comportamiento del transistor.

    Una vez montado el circuito, con el uso de un polímetro obtenemos los siguientes datos en reposo:

    IB=137µA, muy diferente de los 200µA para el punto Q calculado arriba, 
    IC=38.5mA, algo inferior a los 45mA calculados previamente
    VCE=3.9V, algo inferior a los 4.05V calculados previamente
    VBE=690mV, similar a los 0.7V considerados previamente


    Comparativa

    Tenemos por tanto tres casos con resultados diferentes. ¿Cómo podemos fiarnos de la teoría o la simulación si difiere de la realidad?

    Esta es una cuestión que nos lleva a algunas consideraciones importantes: 

    1. Una simulación solo puede acercarse a la realidad si los modelos de los componentes se corresponden con los utilizados en la realidad. En nuestro caso el BC547. Al haber utilizado un modelo genérico, es natural esperar diferencias, aunque eso no quita valor a la simulación como acercamiento al comportamiento del sistema.
    2. Hemos asumido, por simplicidad, que VBE = 700mV en vez de 660mV del caso específico de este transistor. Para mejorar la precisión en este caso es recomendable inspeccionar el datasheet del componente para identificar mejor sus parámetros. 
    3. También hemos asumido, por mantener sencillo el ejemplo, que el voltaje resultante del divisor de tensión se mantiene constante (VB = 1.15V), pero esto no es así, porque al tener la carga del transistor, se produce una pequeña caída de tensión. Como consecuencia el valor real es VB = 1.12V. Esta diferencia, aunque es de solo 30mV, junto con la del punto anterior, de 40mV son fundamentalmente las causantes de las diferencias entre el modelo teórico y el empírico, aunque también hay otros elementos que influyen, como la temperatura del componente.


    Visualización con osciloscopio

    Hasta ahora hemos podido visualizar datos concretos con el polímetro, pero el osciloscopio nos va a permitir:

    • Ver y comparar las señales de entrada y salida, así como su distorsión
    • Visualizar el punto Q y la recta de carga, así como las zonas de corte, saturación y activa.

    Para la visualización de entradas y salidas, disponemos las sondas de un osciloscopio de doble canal del siguiente modo:


    Lo que nos permite ver la amplificación en tensión de la salida (señal roja o amarilla) respecto de la entrada (azul) y su desplazamiento en fase.

    Otra interesante visualización es la de la recta de carga y punto Q. Para ello utilizaremos un osciloscopio de doble canal, que permita modo XY y lo conectaremos según se muestra a continuación. Es importante asegurarse que la tierra del osciloscopio no coincide con la masa del circuito amplificador para que esta disposición funcione.


    Una de las sondas permite medir el valor de corriente IC (a traves de su relación con la caída de tensión en la resistencia shunt) y la otra sonda permite medir el valor de VCE (aunque invertida por tener ambas masas del osciloscopio compartiendo punto central, algo necesario porque dichas masas no están aisladas entre si) Por esto, visualizaremos la información como si aplicásemos un espejo vertical.


    De esta manera, se muestra tanto el punto quiescente (Q) como la recta de carga en el cuadrante superior izquierdo del osciloscopio.


    Distorsión de la señal amplificada

    Finalmente podemos observar los efectos de la distorsión de la señal cuando entra en zona de corte y saturación. 

    Para ello no tenemos más que sustituir Rb2 por un potenciómetro y mover este para alterar la tensión sobre la base y por tanto su corriente IB, lo que desplaza la señal de salida por la recta de carga arriba y abajo. Esto es algo que observaremos tanto en el osciloscopio en modo XY como en el osciloscopio que nos muestra la señal de salida, ya que esta quedará distorsionada.


    Concluímos así este análisis teorico-práctico del comportamiento del transistor bipolar en modo emisor común, para aplicaciones de amplificación.

    Se muestra a continuación el vídeo explicativo completo.


    Tuesday, June 13, 2023

    Circuitos. Simulación de transistores BJT

    Comienzo una serie de posts sobre circuitos electrónicos, en el que pretendo explicar, esta vez en español, el funcionamiento de algunos montajes, con una cobertura muy completa, que pasa por la explicación teórica, la simulación, el montaje y el análisis con instrumentación de laboratorio.

    Hoy comenzaré mostrando una herramienta que considero de gran interés para la simulación de transistores BJT en modo emisor común. Se trata de un circuito configurable, que he desarrollado sobre el simulador de Falstad. Es un circuito que permite seleccionar múltiples entradas y salidas, así como múltiples valores para los componentes, con el fin de probar diferentes circuitos basados en transistores BJT. Permite además ver con detalle todas las señales que circulan por el circuito, así como la curva de entrada y de salida, pudiendo visualizar la recta de carga, punto quiescente y estados del transistor (corte, saturación, activo). 


    Con todo esto, podemos simular circuitos de amplificación, seguidores de tensión, circuitos de conmutación, etc. Una herramienta útil para comprender mejor el comportamiento del transistor y evaluar el comportamiento de circuitos basados en el tran
    sistor bipolar.

    Se puede acceder al circuito de simulación en este enlace: ENLACE

    Además, en el siguiente vídeo se puede encontrar un tutorial se de funcionamiento.


    Friday, September 30, 2022

    AMR-One. 05 Project Management Plan

    This is the fifth on the series of posts about the AMR-One Project. Today it is time to talk about what is a Project Management Plan, how to prepare it, and its application to the AMR-One project.

    The Project Management Plan is defined as the document that describes how the project will be executed, monitored, controlled, and closed.

    But... we already talked about it in my previous post The Project Management Plan. But the important thing is how you prepare it and why. For that, I used the AMR-One Project example and prepared the following video that I hope you like:


    Wednesday, August 31, 2022

    Interview: Technological Startups

    I was interviewed recently about challenges and recommendations for Technological Startups. Although the interview is in Spanish, I share with you the written translation of the interview in English. Also, the video may include English and Spanish subtitles if you like.


    Click to watch the interview


    Good morning Alejandro, On this occasion and taking advantage of your experience as an advisor to technology startups, we would like you to tell us a little about the challenges that a startup of this type faces.


    A technology startup faces multiple challenges. Perhaps the most important of all is to understand the customer and the market, but there are of course many other challenges, such as identifying the right product or service, knowing how to shape and industrialize it, finding investment, correctly designing and executing the marketing and sales strategy, or just grow.


    Could you give us some guidelines that a technology startup should take into account in its first steps?


    The Market

    The first thing is to select the market in which to operate. It has to be interesting, fun, and motivating for entrepreneurs.

    You need to know the sector and the client very well. Do it first-hand, not just from third-party reports.

    It is also necessary to take into account cultural, idiomatic, usability aspects, barriers, competitors, regulatory aspects, registered patents, etc.


    The Product

    On the other hand, there is the product or service. This must be focused on the client and their needs. In many cases, the form of the product is more important, that is, the contribution of value that the customer perceives from the product than the product itself.

    It is recommended to start with a minimum viable product. In other words, to get basic results with the minimum investment in time and cost, that allow the product or service to be tested in the target market.

    Sometimes the entrepreneur focuses on making a product with a very high technological contribution, investing too much time with its associated opportunity cost, when the priority may be to verify if the market is really willing to pay for that product or functionality.

    One of the techniques that is usually recommended is that of "validated learning", which consists of testing assumptions about the interest of customers, aspects that we believe are important to them and perhaps not, and measuring our progress in some way, not by the sales made, but through learning, which is what brings us closer to finding what meets the customer's need or desire.

    When Thomas Edison invented the light bulb, it did not work out the first time, but he made more than a thousand attempts, to the point that one of his collaborators asked him why he persisted in building a light bulb if after more than 1000 attempts he had not succeeded. Edison replied: They are not failures, I learned 1000 ways of how not to make a light bulb.

    But you also have to know how to make the decision to persevere or pivot your strategy.


    Escalability

    The product or service must be scalable, that is, if it is successful, scale factors can be applied, such as offering more units to cover the market, creating accessories or adding functionalities.

    There must be a multiplier factor that turns the startup into a money-making machine when the time is right.


    Business Plan

    A good business plan is a roadmap. You have to be honest and consider alternatives.

    The plan must analyze all the critical aspects of the business: the market, the value proposition, the team, the marketing and sales plan, the growth plan, the financial plan,... and of course a Plan B in case things do not go as expected.


    Financing

    To obtain financing, a startup can go through crowdfunding processes, search for business angels, and many other investment models, but in order to access this investment, the business model must be prepared very well, demonstrate that the idea has passed a certain validation of the market, that it is scalable and that the correct team is available, not only technical but also experienced advisors who mentor and accompany the company not only in its initial start-up but also during its journey and growth.

    We already know the Chinese proverb: "If you want to go fast go alone. If you want to go far go together".

    Tuesday, August 30, 2022

    AMR-One. 04 Work Breakdown Structure (WBS)

    This is the fourth on the series of posts about the AMR-One Project. Today I will talk about the Work Breakdown Structure tool as a way to get the tasks of a project.


    The concept

    Once we have somehow the scope, requirements, or definition of what we are going to do, we could prepare the Work Breakdown Structure (WBS).

    The Project Management Institute (PMI) PMBOK defines the WBS as a “deliverable oriented hierarchical decomposition of the work to be executed by the project team.”

    Basically is an iterative process that takes one large work product, and breaks it down into smaller, manageable work packages.

    In a WBS such elements are the items that are estimated in terms of resource requirements, budget, and timing


    WBS applied to AMR-One Project


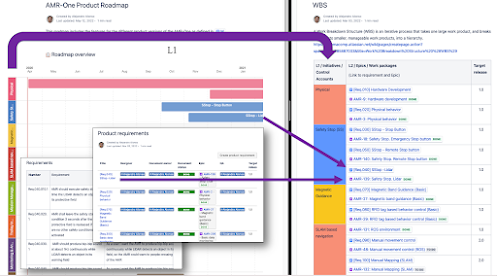
    In the case of AMR-One, I made a simplification of the process, aligning the Product Roadmap, the Requirements, and WBS.

    So in the WBS I added all Initiatives from the Roadmap as L1, and the Features or Epics as L2. Also I added one column to define the version of the product where these Epics will apply.


    WBS related to Roadmap and Requirements


    I didn’t split it into more levels as in this way it is quite aligned with the requirements already defined.

    Now from here, and having the architectural approach mentioned in the previous video, we could start identifying atomic tasks within each Epic. This is work to do with the technical team, identifying dependencies, resources, time, and cost estimation.


    Epics decomposition in atomic activities


    And that is all so far. 

    In the next post, I will explain to you how to prepare a good Project Plan. It is not only to have a plan of tasks, time, and costs. It is much more than that!

    See the following video for more details:


    Saturday, July 30, 2022

    Interview: AGVs and AMRs in the Industry 4.0

    I was interviewed recently about what the AGVs and AMRs are, and why they are so important for the industry. Although the interview is in Spanish, I share with you the written translation of the interview in English.


    click to see the interview (in Spanish)


    Could you explain what automated intralogistics vehicles are and what they are useful for?


    There is no doubt that the industry increasingly requires to operate in an automated way, otherwise, it could not serve the growing demand of the market, while reducing costs and improving the quality of the products and processes.

    One of the ways to go in this direction is to use what are called automated intralogistics vehicles, which can move material completely unattended.

    I'll give you two examples:


    Case 1: Automotive manufacturing

    The first example is in the automotive sector, where car assembly lines operate continuously and therefore require a constant flow of parts from what is called the kitting area, which is where the parts are located, to the assembly area. In this case, the automated vehicles deal precisely with this task without pause, communicating and interacting on their way with different elements of the factory such as doors, elevators, robotic cells, and even people if needed.

    Case 2: Online Shopping

    Another example is that of the orders we make online to Amazon, Zara, or Aliexpress, among others, in some cases with delivery times on the same day. This would be impossible without automation.

    In this case, your order enters the web and from here it enters the supplier's order and warehouse management system. These systems are connected to a Fleet Management System, which manages the dozens or hundreds of automated vehicles that will pick up the products of your order and take them to the picking area, where the operator or even a robot introduces them into the box that then arrives at home.

    In all this process there are a lot of technologies involved, such as artificial intelligence algorithms, perception systems, artificial vision, etc.


    Could you briefly tell us about the difference between the two types of automated vehicles you mentioned: AGVs and AMRs?


    AGVs, an acronym for Automatic Guided Vehicles, normally follow a band on the floor, which is like a road with forks. It is a very proven and very safe technology to drive the vehicle along fixed routes.

    While the AMRs, acronym for Autonomous Mobile Robots, do not require these bands, using other sensors, such as laser scanners or artificial vision based systems and have a greater decision-making capacity, such as to avoid a person or decide the best route to reach a destination.

    The important thing is to choose the technology that best meets the needs of the industry in each case.


    Friday, July 29, 2022

    AMR-One. 03 Architecting the solution

    This is the third on the series of posts about the AMR-One Project. Today I will talk about architecting the solution.

    In the previous post I described the requirements, so we know now what are the functions that the system should accomplish. But before defining the tasks to accomplish these requirements, we need to have an idea of how are we going to build the solution. For that, some people tend to create more technical requirements, in the language of the developers. I prefer to spend some time working on a pre-design of the whole system, from the mechanical, electrical, and software sides, involving representative people from each of the disciplines. It is essentially an iterative process, but having a basic architecture already opens minds to understand the tasks needed to build the system. 

    When we have this general pre-design of the system, we could go further on the class definition for SW, materials for mechanics, or technologies for hardware.

    Let's see as an example how this architecture has been defined in the AMR-One project.


    The AMR-One case

    As we saw in the episode about the roadmap, there are at least two versions of the product, with different functionalities. But we will consider the mechanical, hardware, and software approach for both versions 1.x and 2.x.


    The mechanical approach

    The mechanical approach starts with an overall analysis of the kinematics of the needed system, then continue with some freehand sketches and then with some draft ideas using some computer tools, but not going in deep on the design.

    The hardware architecture

    The hardware and electrical architecture define the components (sensors and actuators) but what is more important, helps to define the processing systems and the functions assigned to each of them. (click on the image to see it bigger)


    HW architecture


    We define 4 processing systems: 

    • Safety PLC (Flexisoft)
    • Low-level controller (LLC)
    • High-level controller (HLC)
    • Cloud base system

    Going a bit further on the functions assigned to them we have that:

    • The Safety PLC is responsible for ensuring the safety measures are executed reliably. It uses several inputs (Safety Lidar and safety stop buttons) to determine when there is a dangerous situation and the system should stop. There is therefore a program inside this PLC to ensure this behavior.

    • The Low-Level Controller (LLC) is responsible for the Low-Level functions, which are the following:
      • Sensory reading
      • Traction motors PIDs controls
      • Velocities (linear and angular) conversion into inputs for the PIDs controls
      • Magnetic guidance
      • RFID tags reading and execution of actions
      • Pinhook control
      • Buzzer control for warnings
      • Device HMI data
      • ROS publisher to connect with HLC/Cloud Monitoring
      • ROS publisher/subscriber to connect with HLC/ROS navigation (AMR-One v2.0)

    • The High-Level Controller (HLC) is responsible mainly for:
      • Communication with the LLC
      • Communication to the cloud
      • User interface (AMR-One v2.0)
      • Localization, navigation, and mapping based on ROS (AMR-One v2.0)

    • The cloud-based processing system is not described in the hardware architecture because it would not require additional hardware from us.

    The software structures

    As mentioned, there are four processing systems, each of them with programs inside. 

    The structures are quite self-explanatory. Only to mention that the items with yellow background correspond to v2.0 of the project and the rest correspond to v1.0 (click on the images to see them bigger)


    See the following video for more details:


    Now we know how to approach the solution and we are prepared to work on building a Work Breakdown Structure to define the Epics and tasks of the project, but this will come in the next post.

    Monday, June 13, 2022

    AMR-One. 02 Product Requirements

    Today I will talk about "Product requirements”, from a conceptual point of view, and how they have been handled under the AMR-One Project, where an autonomous mobile robot for the industry is developed.


    The concept

    Requirements Engineering is one of the processes of Systems Engineering, that is focused on defining, documenting, and maintaining requirements. 

    In the Waterfall Model, requirements engineering is presented as the first phase of the development process while Agile Methodologies, like Scrum, assume that requirements engineering continues through the lifetime of a system.

    Basically, a requirement is a singular documented need that a particular design, product, or process must be able to perform. 

    Once all stakeholders are aligned, the requirements serve as a compass, providing clear direction toward a product's purpose while creating a shared understanding among business and technical teams.


    The steps

    The steps to follow with the requirements are in summary:

    1. Eliciting and expressing requirements (getting the Requirements from the client)
    2. Prioritizing requirements, for example in the form of:
      • Must be done
      • Should be done
      • Could be done
    3. Analyzing requirements to ensure they are complete, clear, and consistent
    4. Analyzing also requirements from the technical point of view to ensure they are feasible in terms of time, cost and execution.

    Types of requirements

    When defining requirements it is good practice to cover several types of requirements, like:
    • Business requirements (Define why the product is needed)
    • Business rules (budget, policies or regulations, brand uniformity requirements,…)
    • User Requirements (what tasks the users can do with the product)
    • Functional Requirements (describe what the product should do)
    • Non-functional Requirements (describe how well a product must perform)
    • External interfaces 
    • Physical settings
    • Development constraint


    In the following video, you could see this more in detail and how requirements are applied to the AMR-One Project, where an autonomous mobile robot for the industry is developed:


    Tuesday, May 17, 2022

    AMR-One. 01 Product Strategy and Roadmap

    This is the first on a set of posts about the project AMR-One. 

    AMR-One Project's scope is the development of an autonomous mobile robot for the industry. The set of posts covers not only the technical part but also project management and strategic concepts.

    In this post we will mention the strategic part of the product, talking about the Product Strategy and Product Roadmap.

    A Product Strategy is a high-level plan that defines your product goals throughout its life cycle and how it will support the organization’s goals. The product strategy will also answer who the product will serve and how it will benefit them.

    These plans are then brought to life on the roadmap.

    A Product Roadmap is a plan of action for how a product or solution will evolve over time. Product owners use roadmaps to outline future product functionality and when new features will be released.

    To build a roadmap, product owners should consider market trajectories, customer value propositions, strategic goals, and effort constraints. Once these factors are understood, the product owner can work with their team to start prioritizing initiatives and epics on the roadmap.

    The roadmap should be updated as often as necessary so that it can remain an accurate source of truth.

    Having that roadmap we should go ahead with the Product Lifecycle Management, which is the process of managing the entire lifecycle of a product from its inception through the engineering, design, and manufacture, as well as the service and disposal of manufactured products.

    See my previous post: 5 tips on ... Product Strategy & Product Roadmap

    See the following video on how these concepts are applied to the AMR-One project:


    Sunday, May 15, 2022

    AMR-One. 00 Introduction to the AMR-One Project

    This post is the introduction to the AMR-One project series, a set of posts and videos on how to plan, manage and execute a technical project as well as on how to technically develop an autonomous robot.

    The AMR-One project objective is to develop a prototype of an autonomous mobile robot for the industry, as a personal project, with some basic characteristics:

    • Rotational base with damped traction system
    • Safety system
    • Pinhook system to hook trolleys from the bottom and carry them.
    • Two navigation modes:
      • Magnetic band guidance with RFID tags control
      • SLAM based navigation using ROS
    • Cloud monitoring (over AWS)


    High, this is Alejandro Alonso and I will be here, through this interesting trip, where we will explore the details of this fascinating project!

    During the following posts I will cover:

    • The product strategy, roadmap, and product requirements (basic to have good focus and scope definition).
    • The project management aspects, including
      • The project management plan (rules on how to manage the project)
      • Work breakdown structure (tool to identify the tasks)
      • Planning from an agile perspective, including the Gantt and dependency graph as well as backlog and sprints plan
      • Risk management, 
      • Cost and time control
      • Change management control, to approach correctly any change in the project
    • The technical design, covers:
      • The architecture of the system, both hardware, and software
      • Electrical design
      • Mechanical design
      • Software design
    • The manufacturing process, using modular structures and a few 3D printed parts

    See the following introductory video.


    I hope you enjoy this trip with me. Let’s make robots!

    Monday, May 2, 2022

    Cloud Monitoring for robots as IOT using AWS

    AWS is a great Cloud Computing platform for many applications. Here I describe how I integrated ROS based mobile robots with IoT (IoTcore), Elasticsearch (Opensearch), and Kibana (OpenSearch Dashboards) to get Cloud Monitoring.


    This video explains that under a personal project named "AMR-One" that covers the design and development of AMR-based solutions.

    Link to the video: https://youtu.be/k_uQZ-rj-6M 


    Related posts:

    Tuesday, April 5, 2022

    The Project Management Plan

    [3 minutes reading]

    The Project Management Plan is defined as the document that describes how the project will be executed, monitored, controlled, and closed. In my previous post I explained the early steps before preparing it. 

    I would say that one of the most important keys to preparing a good Project Management Plan is to understand why this document is needed and how it could really help the success of the project. 

    This document, as mentioned at the top of this post, describes the rules for the execution of the project. We need to understand that in a project there might be many people involved and many phases to execute. It is key to have a common point of understanding of the rules for the management of the project, so anyone could read them when needed. Rules could change of course, but always under some kind of control.


    The Project Management Plan could include the following important sections and components:

    • Scope management plan. Establishes how the scope will be defined, developed, monitored, controlled, and validated.
    • Scope baseline. The scope baseline provides the project and product definition.
    • Requirements management plan. Establishes how the requirements will be analyzed, documented, and managed.
    • Project life cycle description. The project life cycle determines the series of phases that a project passes through from its inception to the end of the project.
    • Development approach. The development approach defines whether waterfall, iterative, adaptive, agile or a hybrid development approach will be used.
    • Schedule management plan. Establishes the criteria and the activities for developing, monitoring, and controlling the schedule.
    • Schedule baseline. The schedule baseline is used to assess the impact of the changes in the project schedule.
    • Cost management plan. Establishes how the costs will be planned, structured, and controlled.
    • Cost baseline. The cost baseline is used to assess the impact of the changes to the project cost.
    • Quality management plan. Establishes how an organization's quality policies, methodologies, and standards will be implemented in the project.
    • Resource management plan. Provides guidance on how project resources should be categorized, allocated, managed, and released.
    • Communications management plan. Establishes how, when, and by whom information about the project will be administered and disseminated.
    • Risk management plan. Establishes how the risk management activities will be structured and performed. 
    • Procurement management plan. Establishes how the project team will acquire goods and services from outside of the performing organization.
    • Stakeholder engagement plan. Establishes how stakeholders will be engaged in project decisions and execution, according to their needs, interests, and impact.
    • Change management plan. Describes how the change requests throughout the project will be formally authorized and incorporated.

    Not all these sections are mandatory. Of course, tailoring practice depends on the kind of project and complexity, company culture, and other factors. But in general, I consider it good practice to have all of these sections included as they cover most of the key important aspects of a project. 

    ---

    Bibliography:

    Wednesday, March 2, 2022

    Before starting a Project

    [3 minutes reading]

    So you have a nice corporate Products Roadmap (see my previous post 5 tips on ... Product Strategy & Product Roadmap) that includes the products that will help your business succeed. Now let’s start with its execution, step by step.  

    These steps are defined in the phases that compose the project life cycle (not the product life cycle). In this case, I will consider how PMBOK groups these phases. 

    There are some initial steps that are quite common in all kinds of projects, even if they use Linear Process models or Iterative Process models (see my previous post 7 tips to choose a Methodology for Software Development): 


    Source: Project Management Body of Knowledge (PMBOK) seventh edition


    Pre-Project Work

    This phase is where we should evaluate in some detail the real business need of the project and the estimation of the costs through the preparation of the Business Case document. It might be a very detailed study or just something simple and quick depending on the project, but is something key to work on. It is not uncommon to find companies that jump from the corporate Products Roadmap (if they even have one) to the project execution, and this directs them to big holes of investment in projects with no clear ROI.  

    A Needs Assessment often precedes the Business Case. The Needs Assessment involves understanding business goals and objectives, issues, and opportunities and recommending proposals to address them. 

    The project Benefits Management Plan is the document that describes how and when the benefits of the project will be delivered and describe the mechanisms that should be in place to measure those benefits.


    Starting the Project

    So we have this Business Case that gives us some understanding of where we are investing the money from the company. Well, the next step is to prepare a Project Charter. This is a formal summarized document that includes the following information:

    • Project purpose;
    • Measurable project objectives and related success criteria;
    • High-level requirements;
    • High-level project description, boundaries, and key deliverables;
    • Overall project risk;
    • Summary milestone schedule;
    • Preapproved financial resources;
    • Key stakeholder list;
    • Assigned project manager, responsibility, and authority level; and
    • Name and authority of the sponsor or other person(s) authorizing the project charter. 


    This document is approved by the Project Sponsor and when it is signed, gives the Project Manager full authority to start the project. 

    Many people see this document as “another boring document that the bureaucracy of the company demands” but this is not at all that. It is a key document to understand the whole key elements of the project from the management standpoint. Without it, management might take decisions without enough global vision of the project.

    Once the Project Charter is approved I recommend going ahead with a kickoff meeting. It is the first meeting with the customer or sponsor and the project team, to give a vision of the project. Many companies do not pay enough attention to this meeting, but it is crucial for the success of the project as we will involve the team in the project from the beginning. This will help identify risks and help in the planning process.


    Organizing and preparing

    Here is where the Project Management Plan is prepared. The project management plan is defined as the document that describes how the project will be executed, monitored, controlled, and closed. It includes all the rules of the game of running a specific project, including the methodology we would like to follow.

    This part is so important that I will dedicate my next post to this subject, so I see you then!


    ---

    Bibliography:

    Thursday, February 3, 2022

    5 tips on ... Product Strategy & Product Roadmap

    [5 minutes reading]

    Product Strategy defines what your product should achieve and how that supports the organization, and is brought to life through the product roadmap.

    A Product Roadmap is a high-level summary that shows the vision and direction of your product offering over time. It is a key strategic document as well as a plan for executing the product strategy.

    Clearly, both are key for a product-focused company, and many books, posts, videos, courses talk about it. Here I will just share with you a few key tips that I learned from my professional experience in the software and automation business. I wish these tips will help you to get a successful business.


    Tip 1. Product strategy and roadmap should support market needs. It is sooooo common, especially for small companies, to focus on what they want to do and not what the market wants to use and pay for! This is a very common mistake and might put at risk the survival of the company. Recommendation: Base your decisions on market analysis, conversations with customers, demo prototypes, proofs of concept, or even sales experts' gut feelings, but consider the customer needs, not your desires.

    Tip 2. Your customer is your mate. Many companies just see customers as the people or companies that pay for their products, but customers should be seen as colleagues, mates to ensure we build a win-win relationship with them. Otherwise, customers will come and go, because they will see you in the same way, as the supplier of something they just need at that moment. Recommendation: Work with the customers in the definition of your roadmap, not just getting their inputs, but involving them in an evolving adventure to have products that will help them as well as you. 

    Tip 3. A roadmap might be flexible, but not too much. A Roadmap is a guide for the whole company. It might be used by the sales department to advance future products to the customers, or by the development team to plan resources, or by the finance department to prepare treasury plans. Some companies tend to adapt the roadmap depending on the commercial opportunities and customers. Roadmaps should have some flexibility to adapt to changing circumstances, but too many changes produce confusion in the organization. Recommendation: Define a Roadmap. September is an adequate moment, so resources could be allocated for the new year, although any time of the year is good if you do not have one. Once you have that roadmap, evaluate the risks and impact of any change you might want to do before applying it. 

    Tip 4. Pay attention to the cost of building a product. Many companies consider that a product costs what it is needed to make it in terms of time and resources, but it is not. There are many other costs related to a product that should be considered from the beginning, like integration testing phases, standardization and industrialization, proofs-of-concept (POC) with customers, documentation, rules compliance (like CE, etc), demos, internal training, and something that many times is not considered: Maintenance. Because there might be bugs, improvements, design mistakes that will need time and resources, especially in a new product launch. Recommendation: Plan considering all the phases of a product life cycle, not only on the few first ones. 

    Tip 5. Give a good product or you will lose the good customer. Quality, quality, quality. This should be a must in any product and many times is not so. The rush to have a product in the market means many times reductions in the validation and industrialization phases. Recommendation: I know it is a trade-off not always easy to solve. The key is to take a strategic decision, planning in advance the time and resources to ensure the product is good enough for the market. Be agile in the execution and reduce functionalities if needed, but not reliability.

    As you could understand, product strategy and product roadmap are very serious strategic decisions. Good practices will not always ensure success, but bad practices will definitely make the company fail. So let’s pay full attention to do it well.

    I recommend reading this post: What is the key to get a successful product?

    Friday, April 23, 2021

    Work with external developers! Seriously?

    [5 minutes reading]
    We are in a very fast technological world, where we need to surf over the waves all the time. As companies, we need to give more and more added value to customers, not to beat the competitors, but to help customers with better solutions, that also help them to be better productive companies.
    To do so, many companies only look at their internal resources and try to do everything on their own, instead of looking for other companies or freelancers to help them. This usually happens due to some incorrect assumptions:

    • Our product is "secret” so my intellectual property is at risk if I use external developers. WRONG!
    • No one understands our products except our employees. WRONG!
    • The cost of working with external developers is too high. WRONG!
    • I will later have dependencies on external developers for maintenance. WRONG!
    • …and many other

    Some others think in the opposite way, but sometimes with wrong considerations:
    • Incorporating external professional resources will give as fast results in a short time. WRONG!

    The reality is as follows:
    • In many cases, companies do not have the capacity to overcome all the developments needed, and therefore, or they delay deliveries, or lose market opportunities.
    • In most cases, it is possible to fragment developments in parts, modules, or services, so internal people could focus on the core "secret intellectual property" parts and external developers could work on the rest.
    • You have to focus on doing well what you do well. If you want to be on everything you will lose focus and opportunities
    • Using good external developers, even being more costly than internal resources, in the end, could be less costly because you may use your internal resources for other more valuable developments and external resources, in the long run could do the work faster.
    • Working with external developers as part of a team helps your internal resources to learn from the external developers and do a smooth technology transfer while development is done, so no dependencies will later exist from external developers.

    So, externalizing development is a good option, but you need to have some extremely important considerations, especially when you start working for the first time in this way:
    • The external development service most of the time requires very clear requirements, usually more detailed than the ones you might use internally, because they do not know many internal assumptions you usually have, due to your knowledge of your products. So consider it will take time from your side. 
    • Set clear short-time deliverables, in an agile manner. This will allow getting results and integrating them into your product soon.
    • Set weekly meetings with the external developers, to follow up on progress. This meeting is not to make pressure, but to help the external service to have a clear common understanding during development.
    • Encourage your team to work frequently with your external developers during the development process and involve them in the testing phases. This is an investment of time from your resources that will give you two things: a) smooth knowledge transfer of the guts of the development for future maintenance, b) help your team to learn from other professionals.

    • But there is probably one of the most important things you have to consider: Having external development services is an investment, not a one-time work. The first time you work with an external service, it will take you time, effort, and money just to help them understand your projects, your standards, your methods, your products, and learn to work together as a team, so do not expect fast and cheap results in the first work. But, this investment in time, money, and effort will greatly help you in subsequent works asked for the same development service. They will work with you like one, already knowing your team, your expectations, your product, your culture, your standards, processes, and methodologies. This is when you really start getting the fast and good delivery, worthing the effort, time and money spent in the past. This is what the graph at the beginning explains.

    In the end, it is more a strategic decision than a quick-fix solution for internal capacity problems. Working with external developers, before you have serious capacity problems will help to be prepared for the peaks and valleys that will come.

    Sunday, February 21, 2021

    Why demos are like demons for developers?

    [5 minutes reading]

    If your team of developers consider demos are a stressfull waste of time that delays development, then you may have an issue that this post could help to solve.

    Some weeks ago, a robotics engineer working for a company in Singapore shared to me his concern with his boss, who was asking for a weekly demo to potential customers of an uncomplete prototype. This is quite a common situation and the reason why I decided to write this post.

    It is clear that demos are key for a business success. Having customers and stakeholders involved in demos gives them not just a way to evaluate a product, but also a living experience. We are rational, but also emotional. Demos should also touch the rational and emotional inside of the audience. But why developers think demos are demons conspiring against development?

    • Sometimes because demo preparation takes long, as reinventing the wheel every time.
    • other times because it involve the same developers and the team do not see them as an opportunity to get good feedback for development and business.

    • and many other, the product or prototype is not properly tested and mature for a demo, so the stress of developers for a highly probable demo failure is too high

    But really there are really good things we could do about demos. Let me tell you some key actions I recommend to follow:

    • Have clear requirements of what the demo should do. These requirements usually are a subset of the product requirements and will give clarity on what features will be part of the demo.
    • Prepare a demo as much standard and automated as possible, so it could be executed with minimum amount of supporting people. This reduces cost of demo and transmit simplicity to the audience.
    • Prepare a written Demo Plan, describing roles of people involved in the demo, what should they do, in what sequence, describing the preparation of the demo, the execution and the post-demo actions. 
    • Keep always one unique interlocutor for each demo, who would give turns to others to clarify specific points of the demo if needed.
    • Before doing a demo, ensure the features have been tested properly and a rehearsal of demo is done.
    • Share with the development team clear reasons why demos are important and a good way to test, learn and correct features, as well as for the business.
    • Rotate the responsibility of doing a demo between different people, so they could learn and dilute stress between each other. Consider also doing demos with sales or product management team instead of developers as main executors of the demo, may be with a developer as support in case of doubts. This shows simplicity to audience and usually sales and product management  people are more adequate for communication with customer than developers.
      If your company requires doing demos with developers, take care of the amount of demos a developer does. Usually, developers need to develop and could understand dedicating part of their time for demos, but too much time doing demos and low time developing may demotivate them.
    • Give clear expectations to the audience. I saw many times failing demos of products, with the promise to be mature products when they were really prototypes in alfa version. Being sincere to the audience on what you are showing will ensure adequate expectations and prevent deception and stress if something wrong may happen. Anyone could understand a failure if they know is an alfa/beta version but not if they believe it is a finished product.

    At the end demos are important and necessary for a company success. The way we prepare and do demos will directly influence the mood of the people involved in the demo and the experience of the potential customers.

    Sunday, January 24, 2021

    Robotics Museums. A seed for passion

    [3 minutes reading]

    A good museum is not only a way to keep the history of our human evolution, but also could be an opportunity to discover inner passions. Also good Temporary Exhibition, Shows and Fairs are interesting ways to see more actual works.

    Few weeks ago I visited The Robot Museum of Madrid (Spain) managed by my friend Daniel Bayon.  In this museum I have since 2017 several of the robots I worked on, like Sam, Melanie and Retrobot among others. 

    This was not only a good opportunity to meet my friends and robots, but also to see again the collection this museum is offering. Some of them from the 80's that reminded me my origins in this passionate world.

    Museums solely dedicated to robotics are not common yet. More common are the temporary exhibitions in different science museums around the world. Many times this exhibitions (either temporary or permanent) are linked to activities for kids related to STEM and robotics/programming workshops. Particularly I see it interesting, because the changes usually comes from the young people and interestingly, more and more is happening that young people, specially in STEM disciplines, wants to work only on what motivates and passionates them, not having any fear to loose a job if they don't like it. 

    It is anyway not so easy, in one part because sometimes there are not enough job offers in what people loves, but other times is because people do not find their inner passion. Fortunately Robotics is one of those professions that are more and more offering good profesional opportunities. If we could unveil their passion at least for those who has robotics in their heart, then we will help the world to have a change done by passionate people and not just by workers.


    Robotic museums around the world

    This is a list of museums that I either visited or know they have at least a permanent section related to robotics. If you know more, just let me know and I will add to the list. Most of them are nowadays temporary closed due to Covid-19


    Europe

    USA

    • American Computer & Robotics Museum. Founded in May of 1990 by visionary collector George Keremedjiev. The museum exhibits span 4,000 years of human history, from original cuneiform tablets to the first personal computers, and include topics such as Artificial Intelligence, Quantum Computing, the Space Race, Cracking the Enigma Code, and more. (Bozeman, MT, USA)
    • Carnegie Science Centre. It has a permanent exhibition called Roboworld. (Pittsburgh, PA, USA)
    • MIT Museum Robot Exhibit. (Pittsburgh, PA, USA)
    • Computer History Museum. This museum, although devoted mainly to computers history, opened a permanent gallery on 1987 devoted to Smart Machine. (Mountain View, CA, USA)

    Asia


    Temporary Robotics exhibits

    What is more common is to have temporary exhibits about robotics. Usually most of the Science Museums have this kind of exhibition, usually once every one or two years. Just to mention here are some of the past exhibitions done in some of these museums. Clic on the museum links below to access to those past robotics exhibitions:

    MIT Museum (Cambridge, PA, USA), Science Museum (London, UK), Science + Industry Museum (Manchester, UK), Museum of Science & Industry Chicago (Chicago, IL, USA), Science Museum Group (UK), Vitra Design Museum (Germany), National Museum of Scotland (Scotland), V&A Dundee (Scotland), Hong Kong Science Museum (Hong Kong)